Tapipy and TapisService
Tapipy and TapisService are powerful Python libraries for interacting with Tapis.
Tapipy User Guide
What is Tapipy
Tapipy is a Python library for interacting with an instance of the Tapis API framework. The package is hosted on PyPi - tapipy. You can install it with:
pip install tapipy
The library is automatically generated by referencing the OpenAPI spec files which a Tapis client built from the
OpenAPI spec files from TACC’s Tapis services. With this functionality a user is able to authorize itself with the
Tapis client and have a ‘live’ library in order to interact with all Tapis services. Usage of tapipy allows for
automatic token refreshing, verbose error messages regarding endpoint inputs, and up to date syntax for all services.
Links
Initializing Tapipy
To initialize a Tapis client object, t, you will replace your_tacc_username and your_tacc_password with your
TACC username and password, preserving the quotation marks shown in the command below. This command will authenticate
you with Tapis for your respective base_url and store your retrieved token for later tapipy calls.
from tapipy.tapis import Tapis

# Create python Tapis client for user
t = Tapis(base_url= "https://tacc.tapis.io",
          username="your_tacc_username",
          password="your_tacc_password")

# Get tokens now that you're initialized
t.get_tokens()
These calls do not produce output. However you can use the following code to see the access token you just generated.
t.access_token
The output should look similar to the following; it describes the access token that was just created.
access_token: *very long string of alphanumeric characters*
claims: {
    'jti': '007fa9e6-f044-4817-a812-12292b2bdbe3',
    'iss': 'https://tacc.tapis.io/v3/tokens',
    'sub': 'your_tacc_username',
    'tapis/tenant_id': 'tacc',
    'tapis/token_type': 'access',
    'tapis/delegation': False,
    'tapis/delegation_sub': None,
    'tapis/username': 'your_tacc_username',
    'tapis/account_type': 'user', 'exp': 1657686889,
    'tapis/client_id': None,
    'tapis/grant_type': 'password'
}
expires_at: 2022-07-13 04:34:49+00:00
expires_in: <function Tapis.add_claims_to_token.<locals>._expires_in at 0x10a070280>
jti: 007fa9e6-f044-4817-a812-12292b2bdbe3
original_ttl: 14400
Where you will have your own access token and the placeholder your_tacc_username will be replaced with the username you used.
Using Tapipy
Now in order to use the Tapis client you can reference the Tapis Live Docs to
browse all service specifications. Tapipy is generated off of these specific specifications, so this is your most up-to-date
reference on tapipy functionality (if tapipy is fully updated).
For example, if you wanted to create a system using the Systems service you would navigate to the proper service in the top bar, browse the sidebar for functions and view the specification in the main pane. An example is displayed below:
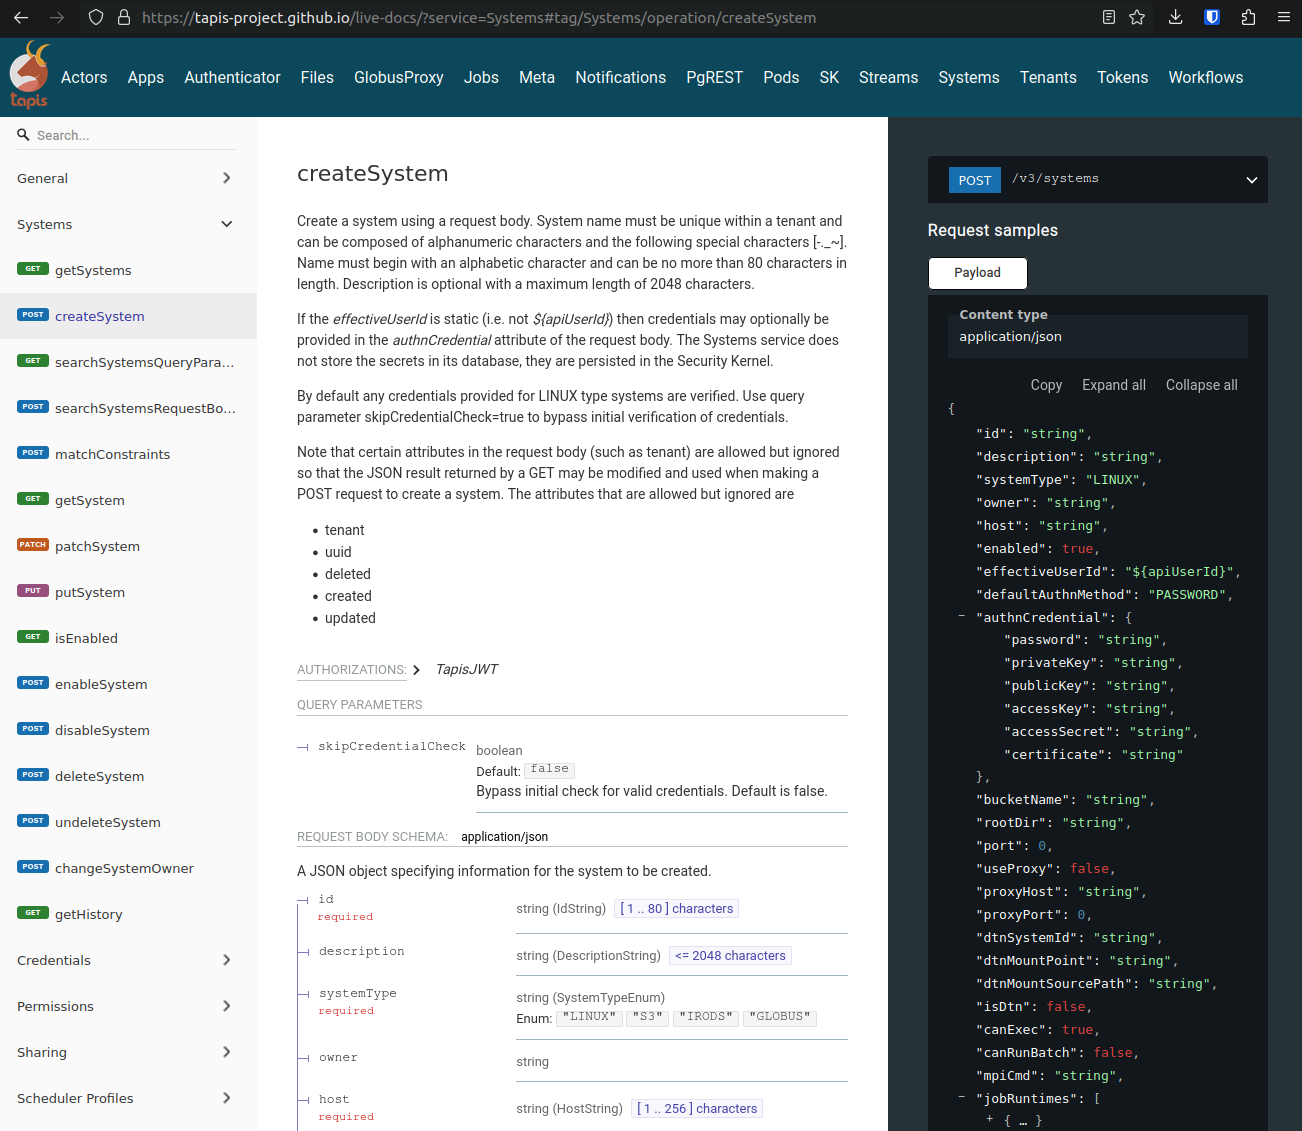
For this example, creating a system, I can see I need to run the following:
t.systems.createSystem(id="id", host="host", systemType="LINUX")
Important
Tapipy 1.3.2 introduces native support for t.files.insert(). Previous a workaround,
t.upload(filePath, systemId, path) was required. Read more here.
You can specify any parameter identified by the spec. Tapipy will detail missing required parameters if they’re missing.
The live-docs are a helpful GUI on top of OpenAPI v3 specifications that each service writes to detail endpoints, attributes, proper content-types, return objects, etc. Depending on the verbosity of the specifications the site could detail what each function and attribute is, along with defaults and type restrictions.
Special User Query Parameters and Headers
For the most part, arguments that can or should be passed to a Tapis endpoint are described in the OpenAPI definition files and
recognized automatically by tapipy. However, due to limitations in what can be expressed in OpenAPI, there are some paramaters
that are not defined in the definition files; for example, the search parameters for various endpoints.
To accommodate these cases, tapipy recognizes two special keyword arguments to all of its methods that correspond to Tapis API
calls (i.e., all of its “operations”). They are:
_tapis_headers- dictionary-like object of header names (keys) and vales.
_tapis_query_parameters- dictionary-like object of query parameter names (keys) and values.
Use the above two special arguments for passing headers (respectively, query parameters) that are not specified in the OpenAPI definition of an endpoint.
For example, I can issue a search using the following syntax:
t.jobs.getJobSearchList(
    limit=5,
    orderBy='lastUpdated(desc),name(asc)',
    _tapis_query_parameters={'key': 'value'})
Additional Tapipy Parameters
The tapipy package allows for spec file customization in Tapis client initialization:
resource_set: str in [“tapipy”, “prod”, “staging”, “dev”]Determines which set of resource to use, defaults to
tapipy.- Important to note that if a
custom_spec_dictionaryis used, it is appended to this resource_set. For example, you would set
prodand then specify a custom specs that will be added on.
- Important to note that if a
custom_spec_dict: {resource_name: str, resource_url: str}- Allows users to modify the base resource set urls.
i.e. I can specify actor as a resource name and change the url.
- Also allows users to add new resources to the set.
i.e. I can add a new resource named “test” with a custom url.
Any new specs will be downloaded and added cached without an explicit recache.
- Allows local resources.
Specify an absolute path in the dict with local: prefixing it and tapipy will load in a local OpenAPI v3 yml spec file.
custom_spec_dict={'cactus': 'local: /home/tapis/myfolder/cactusSpec.yml'}
download_latest_specs: boolAllows users to re-download all specs regardless on if they already exist in the cache. Defaulted to False
- This will happen every time the
Tapisclient is initialized, it’s a tad slower, and can cause live updates to specs. As such, be warned. There are functions to update spec files below.
- This will happen every time the
spec_dir: strAllows users to specify folder to save specs to. Defaults to none which uses Tapipy’s install folder.
If you are updating specs it’s wise to use a different folder in order to not modify the base specs.
Warning
If your user account does not have permission to write to Tapipy’s install directory you will encounter an error due
to file system permissions. You can use spec_dir as highlighted above and use a directory you have permission
to write to. (Important for Docker containers)
Example
The following is an example of some custom parameter setting. As you can see, the abaco resource will now use the spec at
URL#1, overwriting the resource definition in the tapipy resource set, it’ll download it if it doesn’t exist. The
same for the longhorn resource. This means that the Tapis client will now have access to all specs in tapipy like normal,
but with a modified abaco and with a new longhorn resource. All of these are stored at the new spec_dir because you don’t want
to accidentally overwrite any packaged specs when call update_spec_cache() later (talked about in the next section).
from tapipy.tapis import Tapis

t = Tapis(base_url='https://admin.develop.tapis.io',
          username='username',
          password='password',
          resource_set='tapipy',
          custom_spec_dict={'abaco': 'URL#1',
                            'longhorn': 'URL#2'},
                            'cactus': 'local: /home/tapis/myfolder/cactusSpec.yml'},
          spec_dir='/home/username/tapipy_specs')
t.get_tokens()
Tapipy Instantiation with only a Tapis access token
Tapipy can be instantiated with only a Tapis access token. This is useful when you have a created token and don’t want to provide username and password. The minimal instantiation requires the base_url and the token as follows:
from tapipy.tapis import Tapis

t = Tapis(base_url='https://admin.develop.tapis.io',
          access_token='tokenhere')
As the token is already created users do not have to run t.get_tokens(). You can use the client as normal at this point.
Refresh Tapipy’s Cached Specs
Tapipy uses a cache to organize spec dictionaries as pickled files and has the ability to accept custom spec files.
By default Tapipy keeps a set of base spec files in the {tapipyInstallDir}/specs folder. These specs are pre-pickled at
package build time. To update specs,
Warning
If your user account does not have permission to write to Tapipy’s install directory you will encounter an error due
to file system permissions. You can use spec_dir as highlighted above and use a directory you have permission
to write to. (Important for Docker containers)
Three Spec Refresh Methods
t.update_spec_cache()- No inputsWill refresh client’s
t.resource_setresources and save tot.spec_dir.
from tapipy.tapis import Tapis
t = Tapis()
t.update_spec_cache()
tapipy.tapis.update_spec_cache()- Takesresourcesandspec_dirWill refresh specified resources and cache to inputted
spec_dirDefault to refreshing all resources from
tapipyand saving to package install dir.
from tapipy.tapis import update_spec_cache
Resources = Dict[ResourceName, ResourceUrl]
update_spec_cache(resources: Resources = None, spec_dir: str = None)
download_latest_specs- On creation of the Tapis client it possible to specifydownload_latest_specs=True.This will download the latest specs from the Tapis service and save them to
t.spec_dir.This is useful for development purposes, but should not be used in production as it can cause unexpected behavior if the specs change due to errors or changes in specs.
from tapipy.tapis import Tapis
t = Tapis(base_url='https://admin.develop.tapis.io',
          username='username',
          password='password',
          download_latest_specs=True)
Creating and Using Tapipy Refresh tokens
Tapipy will authenticate you to Tapis and generate a token, however to activate automatic token refreshing via refresh token
you must also have a Tapis client created in order to provide client_id and client_key at Tapis initialization.
The following code will show you how to create a client if you don’t already have one and then initialize a Tapis client
with refresh capabilities by also providing client_id and client_key. If you already have a client created then you
can jump to the Fourth step. Feel free to run just the code you need.
from tapipy.tapis import Tapis

# First - Create your normal Tapis client so we can run create_client.
t = Tapis(base_url = 'https://tacc.tapis.io',
          username = 'cgarcia',
          password = 'password')
t.get_tokens()

# Second - List your clients (check if you already have a client created)
t.authenticator.list_clients()

# Third - If you don't have a client, create one.
t.authenticator.create_client()

# Should result in:
'''
[
active: True
callback_url:
client_id: my_client_id
client_key: my_client_key
create_time: Wed, 02 Nov 2022 20:18:01 GMT
description:
display_name: my_display_name
last_update_time: Wed, 02 Nov 2022 20:18:01 GMT
owner: cgarcia
tenant_id: icicle]
'''

# Fourth - Grab the client_id and client_key, add it to your new Tapis client initialization
t2 = Tapis(base_url='https://tacc.tapis.io',
        username='cgarcia',
        password='pass',
        client_id='client_id',
        client_key='client_key')
t2.get_tokens()

# You should now be able to run refresh_tokens with no errors. The t2 object will refresh when needed.
t2.refresh_tokens()
Using the Auto-retry Functionality
Note
Available for tapipy >= 1.6.2
Users to configure a python client to automatically retry failed api calls. Retries can be configured on a per-call basis at the Operation level. Users may provide the following keyword arguments to any tapipy operation to make use of this feature:
_retries: int = 0- The total number of times that a call should be retried. The default is 0. Specifying a value of 1 for retries is equivalent to making 2 back-to-back api calls_retry_delay_sec: Union[int,float] = 0- Total number of seconds to delay between api call retires. Defaults to no delay; all calls are made immediately one after the other until one succeeds or the number retry limit is reached_retry_on_exceptions: List[Exception] = [tapipy.errors.InternalServerError]- A list of exceptions that trigger a retry of an api call. Defaults to a list containing a single item (tapipy.errors.InternalServerError). Any other exception could be used, but in practice, it is likely that the default error is the only one that really makes sense to retry._retry_backoff_algo: Literal["constant", "exponential"] = "constant"- The algorithm to use to calculate the duration from one retry to the next. Defaults to the value ‘constant’. Note, this keyword argument has no effect if_retries== 0 or_retry_delay_sec== 0. Any values provided to this keyword argument that are not one of the two string literals listed below with raise aTapyClientConfigurationErrorexception.constant- the delay between api calls will not change. For example, if a user specifies a 5 second delay with 5 retries. There will be a 5 second delay between each retry.exponential- the delay between api calls will change exponentially. For example, if a user specifies a retry limit of 5 (6 calls in total including the initial call), and a 2 second delay, the delays between each api call will be 2, 4, 8, 16, 32, and 64 respectively.
Using t.files.insert with Tapipy for file upload.
Introduced in Tapipy 1.3.2, the library now has native support for multipart/form-data input data and headers. This
allows us to natively support the t.files.insert operation. The following is an example of uploading a filepath.ext file to a specific
path in a users Tapis system_id system.
with open("filepath.ext", "rb") as data_blob:
    res = t.files.insert(systemId=system_id, path=path, file = data_blob)
Important
The previous static workaround, t.upload(filePath, systemId, local_file_path), is now deprecated and will be removed in a future release.
TapisService User Guide
What is TapisService
TapisService is a Python plugin for Tapipy which extends Tapipy with additional service oriented Python modules. This plugin is useful when creating a Tapis service or using a Tapis service account. The package is hosted on PyPi - tapisservice. You can install it with:
pip install tapisservice
The plugin adds systems for authentication, configs, logging, Tapis errors, TenantCache, alongside
helper code for working in Flask, FastAPI, and Django, three popular Python web frameworks. Python based
Tapis services should make use of tapisservice for at least the authentication in order to not unneccessary rereplicate
code.
Links
Writing a New Service
Getting Started
When creating a new Tapis v3 service, use the following guidelines:
Create a git repository with the following:
+ service: directory for API source code.
+ migrations: directory for migration scripts.
- config-local.json: API config values for local development
- configschema.json: jsonschema definition of the API config.
- Dockerfile: Build recipe for the API service Docker image.
- Dockerfile-migrations: Build recipe for the API service migrations Docker image.
- requirements.txt: Packages required for the API service or migrations scripts.
- docker-compose.yml: compose file for local development.
- CHANGELOG.md: Tracks releases for the service.
- README.md: High level description of the service.
- service.log: Mount into the API container to capture service logs during local development.
Service configuration
A description of all possible service configurations should be provided in the configschema.json file or example,
if your service requires a SQL database, you may have a property, sql_db_url, with the following definition in
your configschema.json:
"sql_db_url": {
    "type": "string",
    "description": "full URL, including protocol and database, to the SQL db.",
    "default": "postgres://myservice:mypassword@postgres:5432/mydb"
},
The fields you define in your service’s configschema.json file will complement those defined in the configschema.json file
included in this repository. Any configs that will be used by all services, such as service_password, should be defined in
the common configschema.json. It is currently possible to override the definition of a config provided in this repository with
a new definition provided in your service’s configschema.json file, but this is not recommended.
Provide values for the configs in the config-local.json file. When deploying to a remote environment, such as the Tapis
develop environment, the config-local.json can be replaced with file mounted from a ConfigMap with different values.
Add any packages required by your service to the
requirements.txtfile. Keep in mind that a number of packages are installed by this repository (such as jsonschema, pyjwt, etc.), so it is possible you will need to add few additional packages.Create a Dockerfile to build your service. The image name for your service should be
tapis/<service_name>-api; for example,tapis/tokens-apiortapis/tenants-api. Here is a general template for the Dockerfile for your service:
# inherit from the flaskbase image:
FROM: tapis/flaskbase

# set the name of the api, for use by some of the tapisservice modules.
ENV TAPIS_API <api_name>

# install additional requirements for the service
COPY requirements.txt /home/tapis/requirements.txt
RUN pip install -r /home/tapis/requirements.txt

# copy service source code
COPY configschema.json /home/tapis/configschema.json
COPY config-local.json /home/tapis/config.json
COPY service /home/tapis/service

# run service as non-root tapis user
RUN chown -R tapis:tapis /home/tapis
USER tapis
Migration skeleton
For services using Postgres, create migration skeleton. Migrations are based on the alembic package and must be initialized. Run the following commands from a terminal:
$ docker run -it --entrypoint=bash --network=<service>-api_<service> -v $(pwd):/home/tapis/mig tapis/tenants-api
# inside the container:
$ cd mig; flask db init
$ flask db migrate
$ flask db upgrade
$ exit
Migrations Dockerfile
Create Dockerfile-migrations to containerize your migrations code. For simple cases, you may be able to just use the following after change <service> to the name of your service.
# image: tapis/<service>-api-migrations
from tapis/<service>-api

COPY migrations /home/tapis/migrations

ENTRYPOINT ["flask", "db"]
Service Dockerfile
Write a docker-compose.yml file to facilitate local development.
TapisService Modules
Code for a number of common tasks has been packaged into tapisservice modules. In this section, we give an overview
of how to use some of the functionality in your service.
Accessing TapisService Modules
You can install tapisservice with pip install tapisservice. Services can import modules directly from this package;
for example:
from tapisservice import auth
from tapisservice.utils import ok
Service Configuration and Initialization
Most services will need to do some initialization tasks before they are ready to respond to requests. For example, they may need to connect to a database or make some requests to some other Tapis services. Initialization also usually involves reading configuration data.
tapisserviceaudits the supplied config file and makes configration data available through a singelton object,conf, available from thetapisservice.configpackage. By importing the object, for instance, in the API’s__init__.pymodule, the config file will be read and validated, and the resulting configurations transformed to Python objects. For example, if a service requires a configuration,max_number_retries, then it could use the following entry in itsconfigschema.jsonfile:
    "max_number_retries": {
    "type": "integer",
    "description": "Maximum number of times the service should retry some complicated logic...",
    },
    . . . # additional properties
},
"required": ["max_number_retries", . . .]
and then, place the following code in its __init__.py file:
from tapisservice.config import conf

print(f"We'll be trying at most {conf.max_number_retries} times."
By the time the import has completed, the service is guaranteed that conf contains all required fields and that
they conform to the requirements specified in the configschema.json file. In particular, the types of the
attributes are the same as that specified in the configchema.json file.
Making Service Requests
The tapisservice.auth package provides a function, get_service_tapis_client which can be used to get a pre-configured
Tapis client for making service requests. A common technique is to fetch the service client in the __init__.py module
so that it is created at service initialization and available via import throughout the rest of the service code.
Within __init__.py:
from tapisservice.auth import get_service_tapis_client
from tapisservice.tenants import TenantCache

Tenants = TenantCache()

t = get_service_tapis_client(tenants=Tenants)
From within any other service modules:
from __init__ import t
. . .
# use the client within some method or function:
t.sk.getUsersWithRole(...)
Authentication
The tapisservice.auth module provides functions for resolving the authentication data contained in a reqeust to your
service.
JWT Authentication
The most common and straight-forward case is when an endpoint in your service requires a JWT. For this use case,
the tapisservice.auth.authentication() function can be used. This function does the following:
Checks for a JWT in the
X-Tapis-Tokenheader, and checks the otherX-Tapis-headers.Validates the JWT, including checking the signature and expiration, and sets the following on the global thread-local,
g:
g.x_tapis_token- the raw JWT.
g.token_claims- the claims object associated with the JWT, as a python dictionary.
g.username- the username from the JWTusernameclaim.
g.tenant_id- the tenant id from the JWTtenant_idclaim.
g.account_type- the account type (eitheruserorservice) from the JWT.
g.delegation- whether the token was a delegation token (True or False).
g.x_tapis_tenant- the value of theX-Tapis-Tenantheader.
g.x_tapis_user- the value of theX-Tapis-Userheader.
g.request_tenant_id- USE THIS JWTtenant_idor, if service,X-Tapis-Tenant.
g.request_username- USE THIS JWTusernameor, if service,X-Tapis-User.
Important
Use g.request_tenant_id and g.request_username. These both resolve to their respective values, obtained
from the incoming request JWT Tapis token. However, the values change when service accounts send “on behalf of” (obo)
requests. Only services within the same site may complete these request, this is checked by tapisservice.
- This function raises the following exceptions:
tapisservice.errors.NoTokenError- if no token was found.tapisservice.errors.AuthenticationError- the token was invalid.
Other Types of Authentication
Some services, such as the Authenticator, use other types of authentication, including HTTP
Basic Auth. Several tapisservice.auth functions are provided to facilitate tasks related to
alternative authentication methods. TODO
Logging
The tapisservice.logs module provides basic logger with a file and stdout handler.
To use it, create an instance of the logger in each module where you want to add logs
by calling the get_logger function with the module name; for example:
from tapisservice.logs import get_logger
logger = get_logger(__name__)
Then add log statements using the logger:
logger.debug(f"some debug message, x={x}."
Error Handling
For REST APIs, the tapisservice.util module provides the TapisApi class and the flask_errors_dict
dict and handle_error() function. Use them by adding the following to your api.py module:
from flask import Flask
from tapisservice.utils import TapisApi, handle_error, flask_errors_dict

# basic flask "app" object:
app = Flask(__name__)

# TapisApi object; created with the app object and the flask_errors_dict to establish the 4 stanza structure of error respones:
api = TapisApi(app, errors=flask_errors_dict)

# Set up error handling to use the handle_error() function -
api.handle_error = handle_error
api.handle_exception = handle_error
api.handle_user_exception = handle_error
Now, from within a controller, raise an exception of type tapisservice.errors.BaseTapisError (or any child class). When
instantiating the exception to be raised, set values for the msg and code attributed to set the
message and HTTP response code. For example, in your controller, you could have:
raise errors.MyServiceError(msg='Invalid sprocket; too many widgets.', code=400)
Then, as long as the errors.MyServiceError class descended from the tapisservice.errors.BaseTapisError, the
HTTP response returned to the user would be:
{
    "message": "Invalid sprocket; too many widgets.",
    "status": "error",
    "version": "conf.version",
    "result": null
}
And the HTTP status code would be 400.
Note that if your code (and, by extension, any code your code calls) raises an exception that does not descend
from the tapisservice.errors.BaseTapisError then the HTTP response will still contain the 4-stanza JSON response above
but the message field will contain “Unrecognized exception type..” to indicate that the exception was not a recognized
exception. In general, your service should not raise exceptions of types other than tapisservice.errors.BaseTapisError and
should instead handle all other exceptions and convert them to the appropriate Tapis Exceptions. This includes all
exceptions from the Python standard library, such as KeyError, AttributeError, etc.
For example, if code you are writing could raise a KeyError, you should catch that and then translate it appropriately. Of course, different KeyErrors in different situations could translate into a user error, a service error, etc.
try:
    app_id = post_data['app_id']
except KeyError:
    raise errors.BadInputError(msg='The app_id parameter was missing. Please be sure to pass app_id.')   # <- decends from BaseTapisError
Working with TapisService, Need to Knows
If you’re developing with TapisService then please ensure you understand the following topics.
Framework Talk
Flaskbase is the original implementation of a tapisservice like scheme where we provide neccessary helper functions for dealing
with Tapis. It was a library packaged in a Docker container which services based (and still can) their containers off of for a working
coding environment. As the name says, this library was originally intended for Flask and overtime it was generalized for more frameworks
and to be used even without any specified framework. Alongside Flask, FastAPI has full support of all tapisservice features.
Django is also a supported framework, however all functionality is not yet at 100%.
These three frameworks already have Tapis services already built off of them. These can be great as example implementations to base your own services off of. Information is as follows:
- Flask:
Abaco. The repository’s
/actorsfolder contains__init__.pyalong withauth.py.Abaco was the original user of Flaskbase and fully implements all
tapisservicefunctionality.
- FastAPI:
Pod Service. The repository’s
/servicefolder contains__init__.pyalong withauth.py.Pods was the first implementation of
FastAPIwithtapisservice, it fully implements alltapisservicefunctionality.
- Django:
PgREST. The repository’s
/pgrestfolder contains__init__.pyalong withviews.py.PgREST implemented most features, however it’s missing a full use of auth capabilities. Making use of only token resolution in the aforementioned
views.py.
Framework Initialization
Flask
from __init__ import Tenants ## Expects "init.py" as described in "Making Service Requests"
from flask import Flask
from tapisservice.tapisflask.utils import TapisApi
from tapisservice.auth import authn_and_authz

def authentication():
    ## You can write your own auth code here
    ## This will run after tapisservice validates token and sets all valuable g object fields
    user = g.request_username
    tenant_id = g.request_tenant_id


def authorization():
    ## You can write your own auth code here
    ## This will run after tapisservice validates token and sets all valuable g object fields

app = Flask(__name__)
api = TapisApi(app)  ## Empty wrapper around "flask.Flask.api" for future use.

# tapisservice authn/authz
@app.before_request
def auth():
    # Provide callbacks for authn and authz which will have access to g object fields.
    # authentication runs, followed by authorization
    authn_and_authz(tenant_cache=Tenants,
                    authn_callback=authentication,
                    authz_callback=authorization)
FastAPI
from __init__ import Tenants ## Expects "init.py" as described in "Making Service Requests"
from tapisservice.tapisfastapi.utils import GlobalsMiddleware
from tapisservice.tapisfastapi.auth import TapisMiddleware
from fastapi import FastAPI
from fastapi.middleware import Middleware

def authentication():
    ## You can write your own auth code here
    ## This will run after tapisservice validates token and sets all valuable g object fields

def authorization():
    ## You can write your own auth code here
    ## This will run after tapisservice validates token and sets all valuable g object fields

api = FastAPI(
    title="MyService",
    middleware=[
        Middleware(GlobalsMiddleware),
        Middleware(TapisMiddleware,
                   tenant_cache=Tenants,
                   authn_callback=authentication,
                   authz_callback=authorization)
    ])
Example of Usual API file imports
This applies most for FastAPI and Flask. Django can use some of this on a case by case basis.
from __init__ import t ## Expects "init.py" as described in "Making Service Requests"
from tapisservice.config import conf
from tapisservice.errors import BaseTapisError
from tapisservice.logs import get_logger
logger = get_logger(__name__)

# Use precreated t object with service
t.systems.get_systems(_tapis_set_x_headers_from_service = True)

# Get config.json site_id key value
site_id_to_use = conf.site_id

# Use logger and Tapis error
try:
    logger.debug("Writing logs to file described in config.json and configschema.json.")
except BaseTapisError:
    logger.debug("Error found, will be given 400 status code and traditional Tapis 5 stanza output.")
Global g object - Flask and FastAPI
tapisservice uses request thread local g objects to expose data globally. This object is created per request and lasts the
lifespan of said request. This allows tapisservice to write valuable information to it for reference by code. Key
variables to use are:
- g.request_tenant_id - Either incoming token tenant_id claim or “on behalf of” headers set by Tapis services.
- g.request_username - Either incoming token username claim or “on behalf of” headers set by Tapis services.
- g.token_claims - the claims object associated with the JWT, as a python dictionary.
Flask natively support a g object. tapisservice simply intercepts the object and writes to it during the authn_and_authz
phase. FastAPI does not natively use a g object, but tapisservice introduces the variable. You can think of both versions of
g to be the same in these docs, use it in both frameworks.
Use g.request_tenant_id and g.request_username
Hammering home the point, tapisservice exposes two sets of similar variables:
g.request_username-g.usernameif not service andg.x_tapis_userotherwiseg.username- incoming request token’susernameclaimg.x_tapis_user- the value of theX-Tapis-Tenantheader
and
g.request_tenant_id-g.tenant_idif not service andg.x_tapis_tenantotherwiseg.tenant_id- incoming request token’stenant_idclaimg.x_tapis_tenant- the value of theX-Tapis-Userheader
Use g.request_tenant_id and g.request_username. These both resolve to the values obtained from the incoming request JWT
Tapis token. However, the values change (to the x_tapis_* variants) when service accounts send “on behalf of” (obo) requests.
This allows services to reference only one variable versus choosing to use g.username or g.x_tapis_user at runtime.
To note, only services within the same site may complete these OBO requests, this is checked by tapisservice.
The remaining variables are useful for debugging or defining exactly who sent a request and exactly how.
Use Tapipy as a Service Account
A service account can still make use of the tapipy client, some changes will apply though.
from __init__ import t ## Expects "init.py" as described in "Making Service Requests"

# Uses tenant and username from client, meaning service's tenant and username.
t.systems.get_systems(_tapis_set_x_headers_from_service = True)

# Use specified _x_tapis_user and _x_tapis_tenant_id rather than service's values.
t.systems.get_systems(_x_tapis_user = "cgarcia",
                      _x_tapis_tenant_id = "tacc")